How To Root Samsung Galaxy V And Install Custom Recovery
Sabtu, 14 Februari 2015
8 Komentar
In this post I made two ways to perform rooting on your Samsung Galaxy V, how unity will use iRoot with the help of Custom Kernel, this way only at designated to Samsung Galaxy V SM-G313HZ that have Build ID KOT49H.G313HZDDU0ANH2 (do not try if Build ID is not suitable because it would make the White screen on the Samsung Galaxy V).
The second way would be to use SuperSU.zip made by Chainfire with the help of a Custom Recovery, but this way there will also be a problem if you do not fit the Samsung Galaxy, every action you do is at your own risk. If a problem occurs (a white screen or bootloop, do Flashing Stock Boot, Stock Recovery or Stock ROM). Or to avoid the risk of the above, you can do Rooting use RootGenius, iRoot, KingRoot, MobileGo, Kingoroot, One Click Root, and SRSRoot without the help of Custom Kernel or Custom Recovery.
Tools above requires a PC as a place to run, if you do not have a PC, you can do Rooting Without a PC using KingRoot Mobile, 360Root Mobile, iRoot Mobile, RootGenius Mobile, Key Master Root, Kingoroot Mobile, TowelRoot, or FramaRoot.
ONE WAY
Preparation:
- Make sure your computer is connected to the internet, because iRoot will need it.
- Anti-Virus turn off your computer, because it will interfere with the process of rooting.
- Smartphone must have at least 30-40 percent of the battery to make the process of rooting
- On your Samsung Galaxy device, turn on USB Debugging Mode.
- Download and install the Samsung Android USB driver on your computer.
- Download and extract the file Odin Downloader on your computer.
- Download file Custom Kernel Samsung Galaxy V SM-G313HZ on your computer.
- Download and install iRoot on your computer.
- Once you have downloaded all the files above, now turn off your Smartphone
- After turning off, you need to boot into Download Mode, to boot into Download Mode press and hold the "Volume Down + Home + Power" simultaneously until the Download Mode active.
- In the Download Mode you will see a yellow triangle warning signs, in this situation you have to press the Volume Up key to continue.
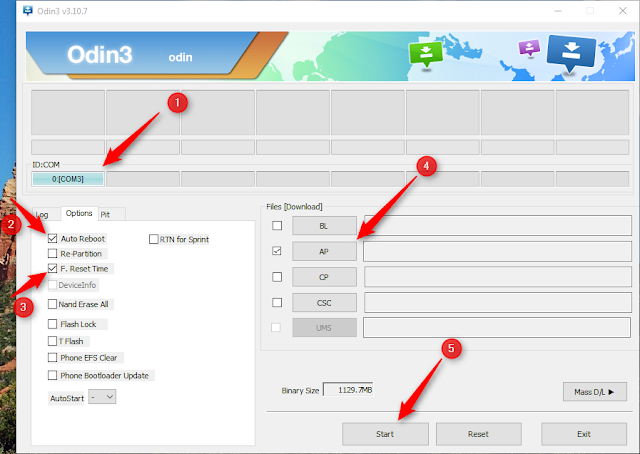
- Now, open the file that you have downloaded Odin3_v3.exe.
- Then connect your smartphone to a computer via USB cable.
- After you connect the smartphone to a computer, Odin will automatically recognize device and message "Added" on Log tab.
- Once the device is detected by Odin, click on the button "AP" and select the file G313HZDDU0ANH2_ROOT.tar.
- Now, click on the "Start" button in Odin to start Flahing. Once the flashing process in completed you will be able to see a green box with the words "Pass" in Odin. During this process the Smartphone will automatically re-boot.
- After that, open iRoot and will automatically detect your device by searching for the driver of the Internet, wait for the process is finished.
- If iRoot successfully detects your Android device, now there will be the "ROOT", click the button and wait for the rooting process is completed.
- If successful, the Samsung Galaxy V SM-G313HZ will restart automatically.
- Then you will find 3 applications china.
WAY TWO
Preparation:
- Smartphone must have at least 30-40 percent of the battery to make the process of rooting
- On your Samsung Galaxy, Enable USB Debugging Mode.
- Download and install the Samsung Android USB driver on your computer.
- Download and extract the file Odin Downloader on your comupter.
- Download and extract file Custom Recovery (TWRP) Samsung Galaxy V SM-G313HZ on your computer. until you find the file (.tar).
- Download file UPDATE-SuperSU.zip.
- Once you have downloaded all the files above, follow the way of unity at the top, but not to use iRoot.
Root Samsung Galaxy V SM-G313HZ
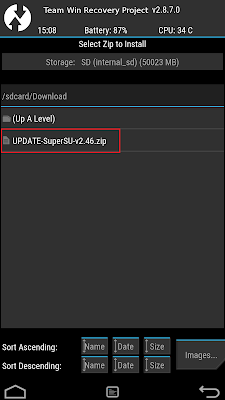
- Once you do flashing a custom recovery (TWRP), put the SuperSU.zip file into memory sdcard Samsung Galaxy. (placed outside the folder)
- Now turn off your Samsung Galaxy V SM-G313HZ device.
- After that go into Recovery Mode, how to press and hold the Volume Up, Home, and Power simultaneously.
- If you have entered into Recovery Mode, Press on Install and select the package UPDATE-SuperSU.zip who have moved to SDCard your Samsung Galaxy.
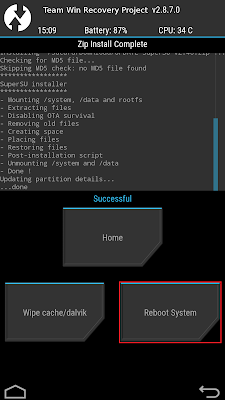
- Now, reboot your device from the TWRP Recovery.
- After restart, you will see SuperSU icon in the application menu.


Cara ini mungkin tidak berlaku untuk semua perangkat Galaxy V SM-G313HZ, jadi hati-hati dengan cara kesatu ini, sebab kalau tidak cocok, bisa membuat layar ponsel anda menjadi White Screen
BalasHapus, cara mengatasi nya gmna gan ?
di flash gan!
Hapusklo no bulid KOT49H.G313HZDBU0AOD1
BalasHapuscara yang kesatu tidak memungkinkan gan, karena cara itu akan flash custom kernel jadi kalau buildnya tidak sesuai HP agan bisa2 white screen.
Hapuscoba cara kedua saja gan!
hh ane keluar white screen saat mau masuk cwm ??? solusi
Hapuscoba flash twrp aja gan
Hapuskalo fail gimana gan?
BalasHapusagan gunain cara mana dan failnya dimana?
Hapus