How to Flash Factory Image on Nexus Devices
Minggu, 15 November 2015
Tulis Komentar
How to Flash Stock Rom on Nexus Devices
Here I describe two ways to Flashing Factory Image on Nexus Devices, the first way is the way that I recommend to providers Factory Images of Nexus Devices. For the second way, perhaps as an alternative if the first method does not work well. If after flashing Factory Image on Nexus Device happen bootloop, please see the settlement of the problem at the bottom of this post.
-------------------
The First Way
-------------------
Requirements: Your Nexus Devices should have at least 20-30 percent of battery to perform the flashing process
Caution: Flashing System Image will delete all user data. Make sure that you create backup data.
- Download and install Google USB Driver on your computer.
- Download and install 15 Seconds ADB Installer on your computer.
- Download System Image that is appropriate for your device, then unzip until you see some files like on the image below into the secure directory.
Example: factory images file Nexus 5X
The devices already support Android 6.0.0 Marshmallow is Nexus 6P, 5X, 6, 5, 9, 7, and Player.
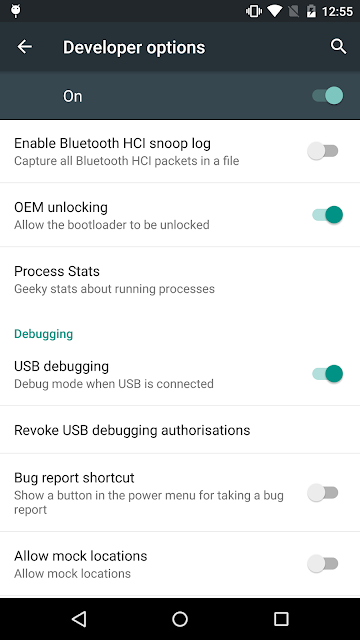
- On your Nexus Devices, Enable USB Debugging Mode and OEM Unlocking.
- Now, connect your device to computer via USB Cable
- Once your device is connected to a computer, then the device you need to get into Fastboot Mode, there are two methods to do so:
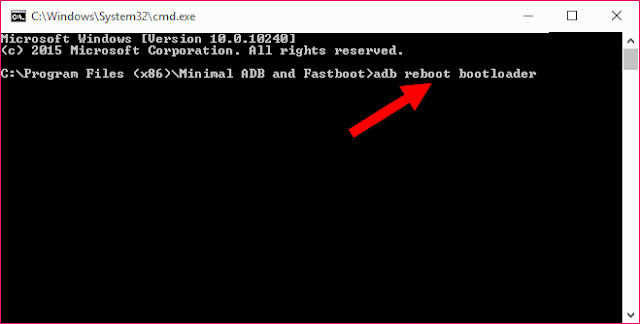
First method: Open a Command Prompt or Terminal and type the command: adb reboot bootloader or adb reboot-bootloader
Second method: Turn off device , then turn it on and immediately hold down the relevant key combination for your device. For example, to put a Nexus 5 ("hammerhead") into fastboot mode, press and hold Volume Up + Volume Down + Power as the device begins booting up.
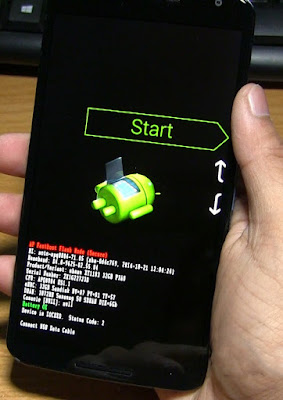
Example: Nexus 6 Fastboot Mode
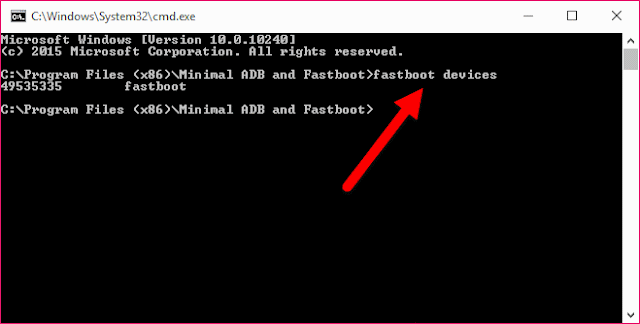
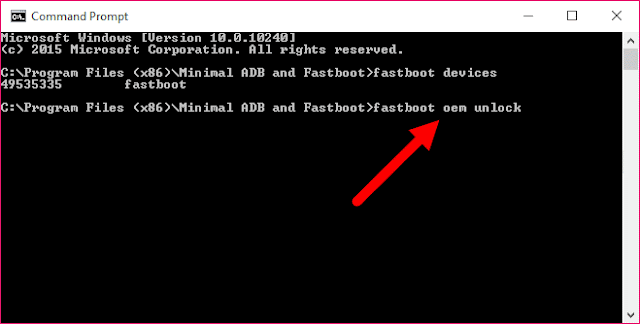
- Type the command: fastboot devices (to make sure the device is connected or not)
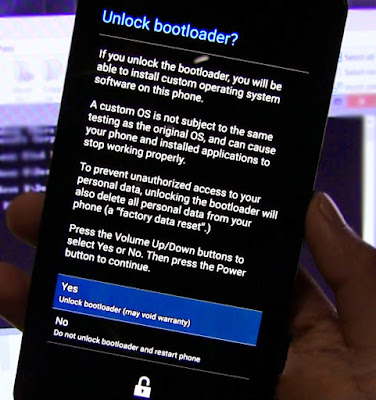
- After that, then unlock the bootloader of your device by typing the command at the commad prompt or terminal: fastboot oem unlock
- Your device will display a confirmation screen. (This will erase all data on the target device.)
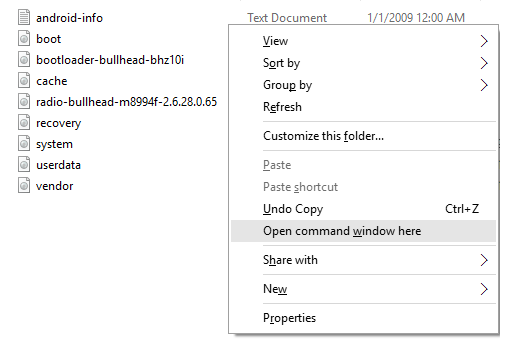
- Once your device successfully Unlock, now go to the folder System Image that you have Unzip, then open your terminal in a way (in Windows, press the Shift key and Right Click, choose "Open command window here"), (on Mac and Linux, Right click and select "Open Terminal")
- Then run the flash-all script (command: flash-all.bat for Windows and command: ./flash-all.sh for Mac and Linux). On a Mac or Linux, you may need a permission of execution to run the flash-all, if such type the command: chmod + x flash-all.sh
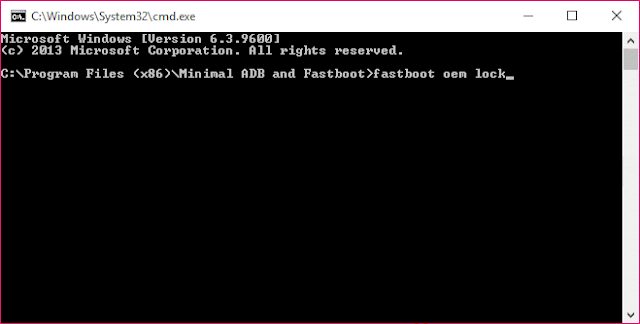
- Once the script is complete, your device will reboots and after that you have to lock bootloader for security by typing the command: fastboot oem lock (requirement: the device must be on condition Fastboot Mode)
- After that, if you want Flash System Image again, you have to open again Bootloader device.
- After flashing Factory Image is complete, if you want to access the Root and install TWRP on your Nexus Devices. See:
----------------------
The Second Way
----------------------
If the first method is successful, then you do not need to do this second way, but if it means the unity you get an error like "failed to allocate 1043723460 bytes” or “update package missing system.img,” , means you have to flash it manually. Follow the steps below:
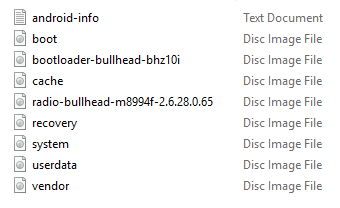
- Unzip file image-bullhead-mdb08m.zip (This file for Nexus 5X) so you see some image files like this:
- After that, move the image files bootloader-bullhead-bhz10i.img and radio-bullhead-m8994f-2.6.28.0.65.img to folder image-bullhead-mdb08m, so you see the image file is assembled as in this picture:
- Then open your terminal in a way (in Windows, press the Shift key and Right Click, choose "Open command window here"), (on Mac and Linux, Right Click and select "Open Terminal")
- Once open Terminal, then type a command like the following one by one:
fastboot flash bootloader bootloader-bullhead-bhz10i.img
fastboot reboot-bootloader
fastboot flash radio radio-bullhead-m8994f-2.6.28.0.65.img
fastboot reboot-bootloader
fastboot flash boot boot.img
fastboot erase cache
fastboot flash cache cache.img
fastboot flash recovery recovery.img
fastboot flash system system.img
fastboot flash vendor vendor.img
The following command is optional as it isn't usually necessary: fastboot format userdata
(Please note: that formatting userdata will (obviously) wipe all user data from the device, this includes everything on your internal storage (images, music, files, etc), apps, and system settings.)
- Once the flashing is complete, you have to lock bootloader for security by typing the command: fastboot oem lock
- Once all are complete you can reboot the device with command: fastboot reboot
----------------------
Troubleshooting
----------------------
If you’ve encountered a problem with the installation process, make sure that you’ve unlocked the bootloader of your device and the USB Debugging is enabled, as described in the Prerequisites section above.
-----------------------Stuck in Bootloop
-----------------------
If the flashing process is completed and your device has rebooted, but it is now stuck in the bootloop showing the loading screen at startup, all you need to do is clear the cache partition. Here is how to do that:
- Put your device back into Fastboot mode.
- Use volume keys and navigate to Recovery Mode and press the Power key to confirm.
- In recovery, use volume keys to navigate to "wipe cache partition" and then press the power button to confirm.
- Now reboot your device.
- If your device is still stuck in the bootloop, go back into Recovery and select "Wipe data/Factory reset".






Belum ada Komentar untuk "How to Flash Factory Image on Nexus Devices"
Posting Komentar
We hope you can leave comments about this post, so that it will be an evaluation material for us to make a better article for the future.
Report if there is an inactive link by commenting, we will immediately make improvements to the link.